Give Your Token a Name to Continue
Blockchain technology has changed a lot. Aside from the fact that is highly secure, we have many tokens that provide value in other areas, too.
Today, we are going to talk about Solana. Solana is the fastest blockchain in the world and the fastest-growing ecosystem in crypto, with thousands of projects spanning DeFi, NFTs, Web3, and more.
This tutorial will be centered on creating your token using the Solana platform. Let's jump in!
- What is a token (briefly)?
- Why would you want to create your own token?
- Prerequisites
- Understanding some important terms
- Main and development environment
- Transaction fee
- Total supply
- Wallet
- Creating a token
- Creating an account
- Minting
- Limiting total supply and burning
- Transferring between wallets
- Naming your token
What is a token (briefly)?
A token in the blockchain world represents a set of rules encoded in a smart contract. Each token belongs to a blockchain address.
It's essentially a digital asset that is stored securely on the blockchain.
Why would you want to create your own token?
Since a token is a digital asset, you can create your own.
Without getting too into the weeds, the basic idea of money/asset is a result of the fact that people agree that something has value. Before fiat money came into existence, it was common for people to trade solely in goods.
They exchanged products of value (according to what they agreed) in order to get another thing of relative approximate value.
In the same vein today, if you have a community or a product and you decide not to use conventional currency (as in your country's currency), you can instead make a digital asset and require people to pay you through that instead.
Just like money, there should be some sort of scarcity — in the crypto/blockchain world, this is known as "total supply". Total supply refers to the number of coins or tokens that currently exists and is in circulation. Ideally, there should not be an unlimited supply of anything that has value.
Another reason to create your token is for learning. Creating your token will teach you some very important concepts about blockchain that will be useful for general blockchain and Web3 development.
Prerequisites
To create a token using Solana, you need the following on your machine:
- You must have Rust installed. Solana is built on Rust. Run
cargo -Vto confirm that you have Rust installed - Install Solana's Install Tool. The method you use depends on your operating system. Run
sh -c "$(curl -sSfL https://release.solana.com/v1.10.8/install)"
Run solana -version to confirm that you have installed it.

You may be prompted to run this:
PATH="/home/localhost/.local/share/solana/install/active_release/bin:$PATH"
Install SPL (Solana Program Library) CLI. This is needed for the creation of tokens:
Run cargo install spl-token-cli.
Understanding some important terms
Before we go further to create an SPL token, there are some concepts that I would like to share with you next.
Main and development environment
Solana operates in two environments: the main environment and the development environment. You might be familiar with these terms as a developer. The main network is where the main Solana network for production is kept.
For development and testing purposes, the development environment is what is used. For this tutorial, we will be using the development environment.
By default, your environment is set to "Main". Before we proceed further, we should set our environment to "Development":
solana config set --url https://api.devnet.solana.com
To check our Solana cluster environment, run: solana config get.

This confirms that the environment is in development.
Transaction fee
A transaction fee is paid when a certain amount of cryptocurrency is transferred from one wallet to another.
Transaction fees are flexible in nature and can vary based on how busy the network of blockchain is.
Total supply
As we noted earlier, total supply refers to the number of tokens that currently exist and are either in circulation or locked somehow.
It is the sum of coins that have been mined (or issued; minted) minus the total number of coins that have been destroyed or burned.
Wallet
A cryptocurrency wallet is a device, physical medium, program, or service that stores the public and/or private keys for cryptocurrency transactions.
In addition to this basic function of storing the keys, a cryptocurrency wallet more often also offers the functionality of encrypting and/or signing information.
Think of it as your physical wallet where you keep your money. Just as you can have multiple wallets physically, you can also apply the same principle to blockchains.
Creating a token
Before we create a token, you need some Solana (even one Solana will suffice). To get one Solana, you can airdrop (like so: solana airdrop 1) from your terminal.
(Note: Remember this is not a real Solana, since we are in a development environment)
To create a token, we are going to use the SPL tool that we previously installed. Run spl-token create-token. This will create the token, which can also be known as a token identifier. Copy it and keep it saved.

Creating an account
What we did above is create a token — now we need to have an account to store it.
Just as we store money in our bank accounts, we can have different cryptocurrency in different accounts.
To create an account to store our token, run: spl-token create-account <token-identifier>. Replace <token identifier> with the actual token identifier you copied out.

Minting
Minting crypto is the process of generating new coins by authenticating data, creating new blocks, and recording the information onto the blockchain through a proof of stake protocol.
To mint a token using Solana, run: spl-token mint <token-identifier> <token-amount>.

I minted 1,000,000 tokens for this. You are at liberty to do more than or fewer than that. Note that I can mint more tokens to the just minted tokens in the account by running spl-token mint <token-identifier> <token-amount> again.
You can always check your balance by running: spl-token balance <token-identifier>.
We can create as many tokens as we like and create separate accounts for them.
Limiting total supply and burning
Limiting total supply simply means that you want to prevent more tokens from being minted. The reason for this is embedded in economics.
When anything has too much surplus, the value tends to drop. Now you may wonder, what if the coin is already in surplus? This is where burning happens.
Burning in crypto means permanently removing a number of tokens from circulation. This is typically done by transferring the tokens in question to a burn address — a wallet address from which they cannot ever be retrieved. This is often described as destroying tokens.
Limiting our total supply is achieved in Solana by disabling our mint power or authority. To do that for a particular token, run: spl-token authorize <token-identifier> mint --disable.

This now means that there is no way we can add additional tokens to the total supply.
To burn some tokens, we run this: spl-token burn <token-account-addresss> <amount>.
I will burn 200,000 tokens out of my 1,000,000 tokens (the total supply).

Transferring between wallets
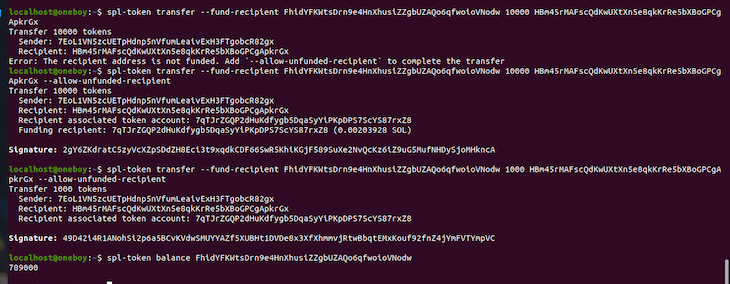
Transferring between wallets is as simple as what we do regularly with bank accounts; we can transfer from one account to another account. You just need the wallet address. To get more information about transfer commands, run spl-token transfer --help.
It should give all the necessary information needed to run a transfer.
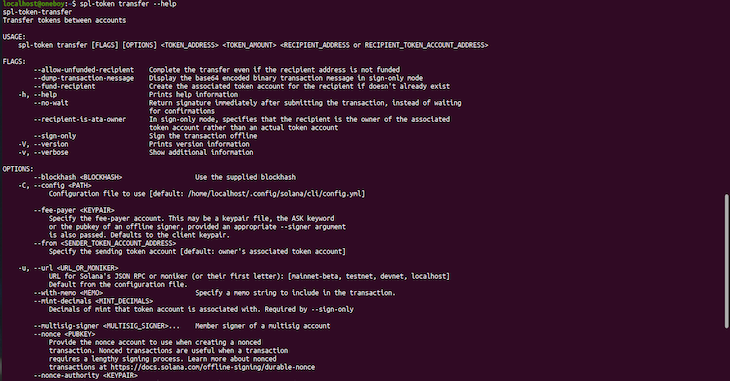
spl-token transfer \[FLAGS\] [OPTIONS] <TOKEN_ADDRESS> <TOKEN_AMOUNT> <RECIPIENT_ADDRESS or RECIPIENT_TOKEN_ACCOUNT_ADDRESS>
Naming your token
You can give your token a name of your choice. It is as simple as being on the main environment and making a pull request after adding another JSON block to the large tokens list in src/tokens/solana.tokenlist.json.
You can look at this page for further information.
Conclusion
Congrats! You have followed through to the end of this guide. This is a tutorial that centers on creating a token with the Solana network and I hope you found it useful.
Aside from meeting the requirement, we went ahead and created our token, before creating an account (wallet), within which we stored the token. We also explored some terms such as total supply, burning, and minting to help provide context.
Join organizations like Bitso and Coinsquare who use LogRocket to proactively monitor their Web3 apps
Client-side issues that impact users' ability to activate and transact in your apps can drastically affect your bottom line. If you're interested in monitoring UX issues, automatically surfacing JavaScript errors, and tracking slow network requests and component load time, try LogRocket. https://logrocket.com/signup/
LogRocket is like a DVR for web and mobile apps, recording everything that happens in your web app or site. Instead of guessing why problems happen, you can aggregate and report on key frontend performance metrics, replay user sessions along with application state, log network requests, and automatically surface all errors.
Modernize how you debug web and mobile apps — Start monitoring for free.
Source: https://blog.logrocket.com/building-token-solana/
0 Response to "Give Your Token a Name to Continue"
Post a Comment